Just a couple of cute ideas for some yummy and pretty sugar cookies, for Game Day and Every Day.
I found the ultimate cookie cutter website, Off the Beaten Path. Seriously, this online store is amazing. They have all kinds of cookie cutters from stilettos to poinsettias to states, their selection is incredible. And they're only about $1.50 a piece. So, when I was looking for a hot air balloon cookie cutter (for the St. Louis Balloon Race pre-party, of course) this site had it. And by the time you pay for shipping, I figured I might as well order every cookie cutter that I could imagine wanting in the next year at the same time. So, I also found these very cute girly ones (purse, lips, XO, sunglasses, engagement ring), football ones (football and helmet) and many others. It's very difficult to pick out just a couple.
I use a very simple recipe for the cookies and icing. I usually use homemade icing to coat the cookie and then Betty Crocker or another store bought brand for the details. I find the store icing to be thicker and easier to work with on the accents.
Sugar Cookie Recipe:
1 cup butter
1 cup sugar
1 egg
1 tsp vanilla
2 tsp baking powder
3 cups flour
Heat the oven to 400 degrees F. Cream the butter and sugar with a mixer. Beat in the egg and vanilla. By hand, blend the flour and baking powder in a separate bowl. Then add the baking powder and flour mixture to your creamy mixture 1 cup at a time. Roll out the dough on a bed of flour (not included in the 3 cups) and cut out your favorite cookie! Bake 6-10 minutes on an ungreased cookie sheet. I highly recommend lining the cookie sheet with parchment paper so the cookies don't burn or stick.
Icing Recipe:
3 egg whites
1 tsp vanilla
3 cups icing sugar
Mix all together with a mixer. Divide into small bowls and add food coloring.
To make the icing details, I also recommend using a Mechanical Pastry Bag, like this one from Williams-Sonoma. It makes it easy to control the icing and add fun details like a basketweave which I used for the basket of my hot air balloon cookies.
Girly Cookies that I made when my college roomie came to visit:
Cookies for the big OU TX football game (Go Sooners!):
Saturday, December 5, 2009
Thursday, November 12, 2009
A Magical Evening With Harry Potter
Like many people in the Muggle world, I was extremely excited about the release of the newest Harry Potter movie, Harry Potter and the Half-Blood Price – the 6th movie in the Harry Potter series. Opening weekend happened to be near my birthday, so my co-worker Rachel , my husband Justin and I all planned an amazing Harry Potter Birthday Party. Some of our great ideas:
Decorations - Snitches
We wanted to create a Harry Potter environment without actually buying “Harry Potter” party supplies….so after much brainstorming we created a lot of great decorations. We made golden snitches by putting two fake feathers in a Styrofoam ball and then spray painting the entire thing with gold spray paint and then gold glitter spray. We made about 20 and displayed them around the apartment – some hung from the air with silver string and others perched around.
Decorations – Hogwarts
I made several signs out of black and gold poster board and gold paint with gold glitter. I put one on the front door of my apartment building that said “Platform 9 ¾” and another on the front door of my apartment that said “Welcome to Hogwarts.” Also, outside by the door, I posted a sign saying “Please Leave Your Brooms At the Door” and positioned a little witch’s broom next to the sign. Inside the apartment, we displayed a sign “Beware of Moaning Myrtle” on the bathroom door.
Decorations – Potions
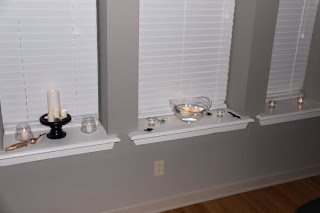
Hobby Lobby had a sale on glassware and so we picked up several cute, small glass containers to serve as bottles for our potions (food coloring + water). We displayed them on a shelf and accented them with candles.
Decorations - Yule Ball and Candles Everywhere!
Final accents included some glittery silver snowflakes descending from our dining room light to give the party a little "Yule Ball" flavor. And we turned out the lights and put candles everywhere that we could - including some great floating candles in a nice glass bowl. Definitely gave it a nice Great Hall feel. I also found some cheap quills at Hobby Lobby and stuffed them in a vase with a snitch.
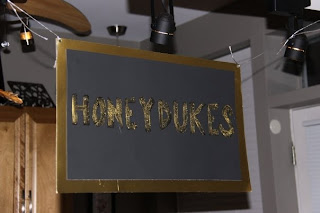
Food – Honeydukes
The food serving area was labeled with a sign saying “Honeydukes” where we had a Chocolate fondue station, drinks and other snacks for our guests. We printed little place cards to showcase our creative food names:
Mead = beer
Pumpkin juice = orange cream soda
Butter beer = mix one shot of Buttershot with a cream soda in a mug
Broomstick salad = Vermicelli (noodle) salad
Dragon tenders = chicken tenders
Peppermint humbugs = peppermint candies
And more that I can't remember....
For the birthday cake, my husband made the most amazing "Harry Birthday" cake out of two giant chocolate chip cookies with ice cream in the middle. He made the ice cream filling half mint chocolate chip and half chocolate chip cookie dough. To mold the ice cream, he used our cheesecake pan. After making the giant cookie sandwich he decorated it beautifully with yummy icing.
Party Favors - Bertie Bott's Every Flavor Beans and Wands
I bought two giant bags of Jelly Belly jelly beans and put them in individual clear bags tied with maroon and gold ribbons (for Griffydor, or course). Then I found a logo of Bertie Bott's online and made little circle sticker labels to go on the bags. I put them all in a bowl for guests to grab and take with them to the movie.
We had a couple kids coming to the festivities...and other guests who act like kids...and so we decided to make our own magical wands. We bought a floral arrangement of sticks (basically...) from Hobby Lobby and cut them to a nice wand length (about a foot and a half). We then sprayed them with gold glitter spray to give them a nice sparkle. I displayed them in a vase and let each guest pick their wand.
The party was great - lots of people came for the celebration and we enjoyed the movie - can't wait for the 7th one!
Saturday, October 10, 2009
Spooktacular Halloween Cards
If there's one thing I have learned about myself in recent years, it's that I love greeting cards. Seriously, LOVE them. Giving them, receiving them - it doesn't matter. I think it just sends the outward signal that a person took the time to think about you, pick something out just for you, write a little something and put it in the mail. I know we're only talking maybe 5 minutes and $5 here...but it's just so much fun to get that little something in the mail. So...needless to say, I spend a lot of time in the card aisle at Target....or when I can, Papyrus (their cards are AMAZING! Like little works of art). However, it was decided by both my husband and I that maybe I should try to save a little money and expand my creativity by my making my own cards - so here goes - Halloween cards made by me!
Well....with a little help from Michael's and Martha. :) I found this amazing spider web punch at Michael's that I wanted to incorporate somehow. If you want to use it as a border, you'll want to buy the straight edge web punch and the corner punch.
Also, at Michael's I bought white glittery card stock, shimmery purple cardstock, black greeting cards with envelopes, foam adhesives to add depth and a pack of assorted cardstock colors.
First I cut the white paper into squares about 3.5"x3.5" and used the punch around the edges. Next I cut the purple paper into 2"x2" squares and glued the purple paper on top of the white. I decided to make the center of the card one of three characters: pumpkin, candy corn or ghost. For each of them I made a template and then made multiples and glued them all together. Below you can see the candy corn pieces ready for assembly.
To attach the character to the purple paper I used the little foam adhesives to give the cards some depth. Finally, I simply glued the spider web/character assembly to the front of the card and I had myself a cute little Halloween card! I made 12 cards and with the expensive punches I'm not sure if I saved any money vs. buying cards....but I'm sure I'll use the materials again and so in the long run.... :) And they were fun to make!
Sunday, September 27, 2009
From the Kitchen....Grilled Bacon Wrapped Shrimp & Chicken
All summer long I had this craving for grilled shrimp. My husband doesn't like shrimp, unfortunately, but when his younger brother Weston came to visit, I jumped on the opportunity! I mean, how can anything wrapped in bacon be bad? I found this great marinade recipe and mostly followed it:
What You Need:
-11-12 strips of bacon
-1 lb 22-24 ct shrimp or 1 lb chicken breast tenders
-1/2 cup soy sauce
-1/2 cup olive oil
-1/4 cup Soy Vay Island Teriaki Sauce
-zest and juice of two limes (or you can add in some lemon juice instead)
-1 tbs brown sugar
-4 cloves garlic (or use garlic salt instead of regular salt)
-1 tbs minced ginger (we used ground ginger)
-salt and pepper
What You Need to Do:
1. I bought peeled and deveined shrimp, but if you don't...first step is to peel and devein.
2. Mix the marinade in a giant zip lock bag and add in the shrimp or chicken.
3. Let the marinade and meat sit in the refrigerator for at least 20 minutes.
4. While the marinade is sitting, partially cook the bacon (I microwaved it for half of necessary time)
5. After at least 20 minutes, take the marinade bag out and begin to skewer the meat. For the shimp, we wrapped half a piece of bacon around each shrimp. For the chicken tender, we folded it in half or thirds and wrapped an entire piece of bacon around it.
6. When you place the meat on the skewer, I recommend using two skewers for the same piece of chicken or shrimp so the bacon stays on the meat and also so the meat doesn't rotate on the skewer.
7. Warm up the grill and then place the skewers on the grill.
8. Brush additional marinade onto the meat after you put it on the grill and again when you turn the skewers over. When we made chicken we also skewered some pineapple and brushed the marinade on it too - it was very tasty!
9. Cook until done (the bacon should be crispy and the meat obviously cooked through).
10. Enjoy!
Friday, September 25, 2009
From the Kitchen....Macaroons
The day I discovered coconut macaroons from Trader Joe's was a great day. Actually, I believe my business school roommate Bethany introduced the wonders of them to me - 100 macaroons and 1 million calories all for about $4. Could life be better? Then I loved to St. Louis and for some reason Trader Joe's stopped carrying them. So, my husband suggested I make my own. (Genius!) They were super easy and crazy delicious.
What You Need:
4 Large Egg Whites at Room Temperature
1 Cup White Sugar
1/4 Teaspoon Salt
1 Teaspoon Vanilla
1/2 Cup Cake Flour, Sifted
3 Cups Sweetened Shredded Coconut
What You Need to Do:
In a stainless steel bowl, placed over a saucepan of simmering water, whisk together the egg whites, sugar, and salt. When this mixture is warm to the touch, and nice and creamy, remove from heat and stir in the vanilla extract, flour, and coconut. Cover and refrigerate for about one hour, or until firm.
Preheat oven to 325 degrees F and line two baking sheets with parchment paper (not to be confused with wax paper...believe me you only need to make that mistake once as you take out the burning piece of paper and the smoke alarm is blaring.)
Place small mounds (about 1 tablespoon) of the batter on the parchment-lined baking sheet, spacing several inches apart. Bake for about 15 to 20 minutes or until golden brown. Remove from oven and let cool on the baking sheet for about 10 minutes and then place on a wire rack to cool.
Makes about 2 dozen Macaroons.
*Recipe courtesy of Joy of Baking
To make my macaroons a little more "Au Bon Pain"ish I dipped some of them in chocolate half way. I melted a mixture of baking chocolate and milk chocolate in the microwave and dipped away.
For an added touch, I melted some white baking chocolate and drizzled it on top of the milk. I made a mess doing this...but they turned out quite pretty and very delicious. My one comment about the entire order is the chocolate did not harden very well. I stuck them in the fridge and that helped, but honestly I think I should have used a mixture of chocolate and paraffin wax like they do in candy making....definitely going to look more into this.
Wednesday, September 23, 2009
Lucky in Love
One of my readers (and I realize there's only like 3 of you out there) has requested a posting on being a bridesmaid, as she is about to be one herself! I was extremely honored to be a bridesmaid recently for my best friend from high school, Sheila. I had amazingly wonderful bridemaids (including Sheila!) so now I was so glad to have the opportunity to return the favor. One of my fabulous responsibilities included planning and hosting the bachelorette party! Now Sheila is as Irish as can be (complete with red hair, an Irish first, middle and last name, and a graduate and obcessive fan of Notre Dame) so I chose the theme "Lucky in Love." I planned on incorporating shamrocks wherever possible which led to this cute little invitation.
I used a shamrock punch to let the green paper show through plus a little jewel for some bachelorette bling. I stuffed them in pink envelopes and sealed them with the sticker shown above. For decorations I stuck with the pink and green theme including the cake, flowers, napkins, plates, tableclothes and you guessed it....Japanese laterns (I'm a bit obcessed). The cake was beautiful but as you can see describing the pink I was going for to the cake person on the phone hundreds of miles away is more difficult than I thought. So....it was more of a purple. Still cute and delicious though!
For the lingerie party we first played a quiz game where all of the ladies tried to answer questions about the groom. We sent a list of questions to the groom (without Sheila knowing) and played the game with his responses. For those of you planning a party in the future....some of my favorite questions are:
1. Where were you (the groom) born?
2. What is your favorite color?
3. What was your first pet?
4. If you could visit one place in the world, where would it be?
5. What was your favorite class in undergrad?
6. What was your nickname as a kid?
7. What is your favorite color for (Bride's name) to wear?
8. What is your favorite part of (Bride's) body?
9. What are you looking forward most to about married life?
10. What was the name of your first girlfriend?
11. When did you know that Sheila was the one?
12. Where was your first kiss with (Bride)?
13. What was your first impression of (Bride) when you met her?
14. If you could have a dream car ($ is no object) what would it be?
15. Do you want pets? What kind of animal?
16. How many kids do you want to have?
17. What is your favorite food?
18. What is your favorite song?
19. What is your pet name for (Bride)?
20. What is (Bride's) pet name for you?
21. What is your idea of the perfect date?
After the quiz, was the grand gift opening! I bought some clothesline (pink, of course) and hung it up in the living room so as Sheila opened each gift, she could hang it up for display! Ooo, la la!
Also, I stole a very cute idea from my sister-in-law's shower, and we made the Groom a "Honeymoon Menu." After each gift was opened, we thought of a food that described each "outfit" and so on the honeymoon, the groom could pick his dessert. :)
Later in the planning stages, I found out that the Bride-to-Be wanted to celebrate her last days of single-dom by going to a western dancing club about one mile from my house. Despite the very close proximity, we had never been here....probably b/c we left Tulsa before we were 21. So....I decided to make this a multi-themed event. :P Shamrocks for the lingerie party with a swift transition to Cowgirls Night Out. Eh, why not! Two themes for the price of one. To properly outfit the attendees, I went to Party City, where I must say, I was shocked to find an entire line of Cowgirl themed bachelorette gear. I got sheriff badges, bandanas that said "Party Crew," a "Most Wanted" garter and the most amazing hat, modeled below by the bride herself. Hott.
Everyone got cowgirl and we looked amazing. Yee haw. From there we headed off for a night of dancing (ladies night!) at Caravan Cattle Co.
Other than that, as a bridesmaid, I assembled and delivered adorable welcome gift bags (Notre Dame and wedding colors) complete with Advil, a CD of songs about Oklahoma and yummy goodies, set up a photobooth at the wedding reception, took tons of photos of every possible moment, arranged the video taping of the ceremony (thanks to my great husband!), attended bridal showers and an amazing 80s themed bachelorette party in Chicago, gave fabulous presents and cried as Sheila walked down the aisle. :) She was absolutely beautiful. Now that I have been both a bridesmaid and a bride....I think the most important duty as a bridesmaid is to make sure the bride knows you are there for her - call often, send cards and ask questions. She'll want to talk about everything - it is her big day afterall! :D And it is sooooo much fun.
Subscribe to:
Posts (Atom)